Spring in Perth is buzzing. The grevilleas are flowering, the bees are busy in the lavender, and every second child you know has found a ladybird and wants to keep it in a jar. That fascination with tiny creatures is one of the easiest interests to follow, and it fits beautifully into a tuff tray.
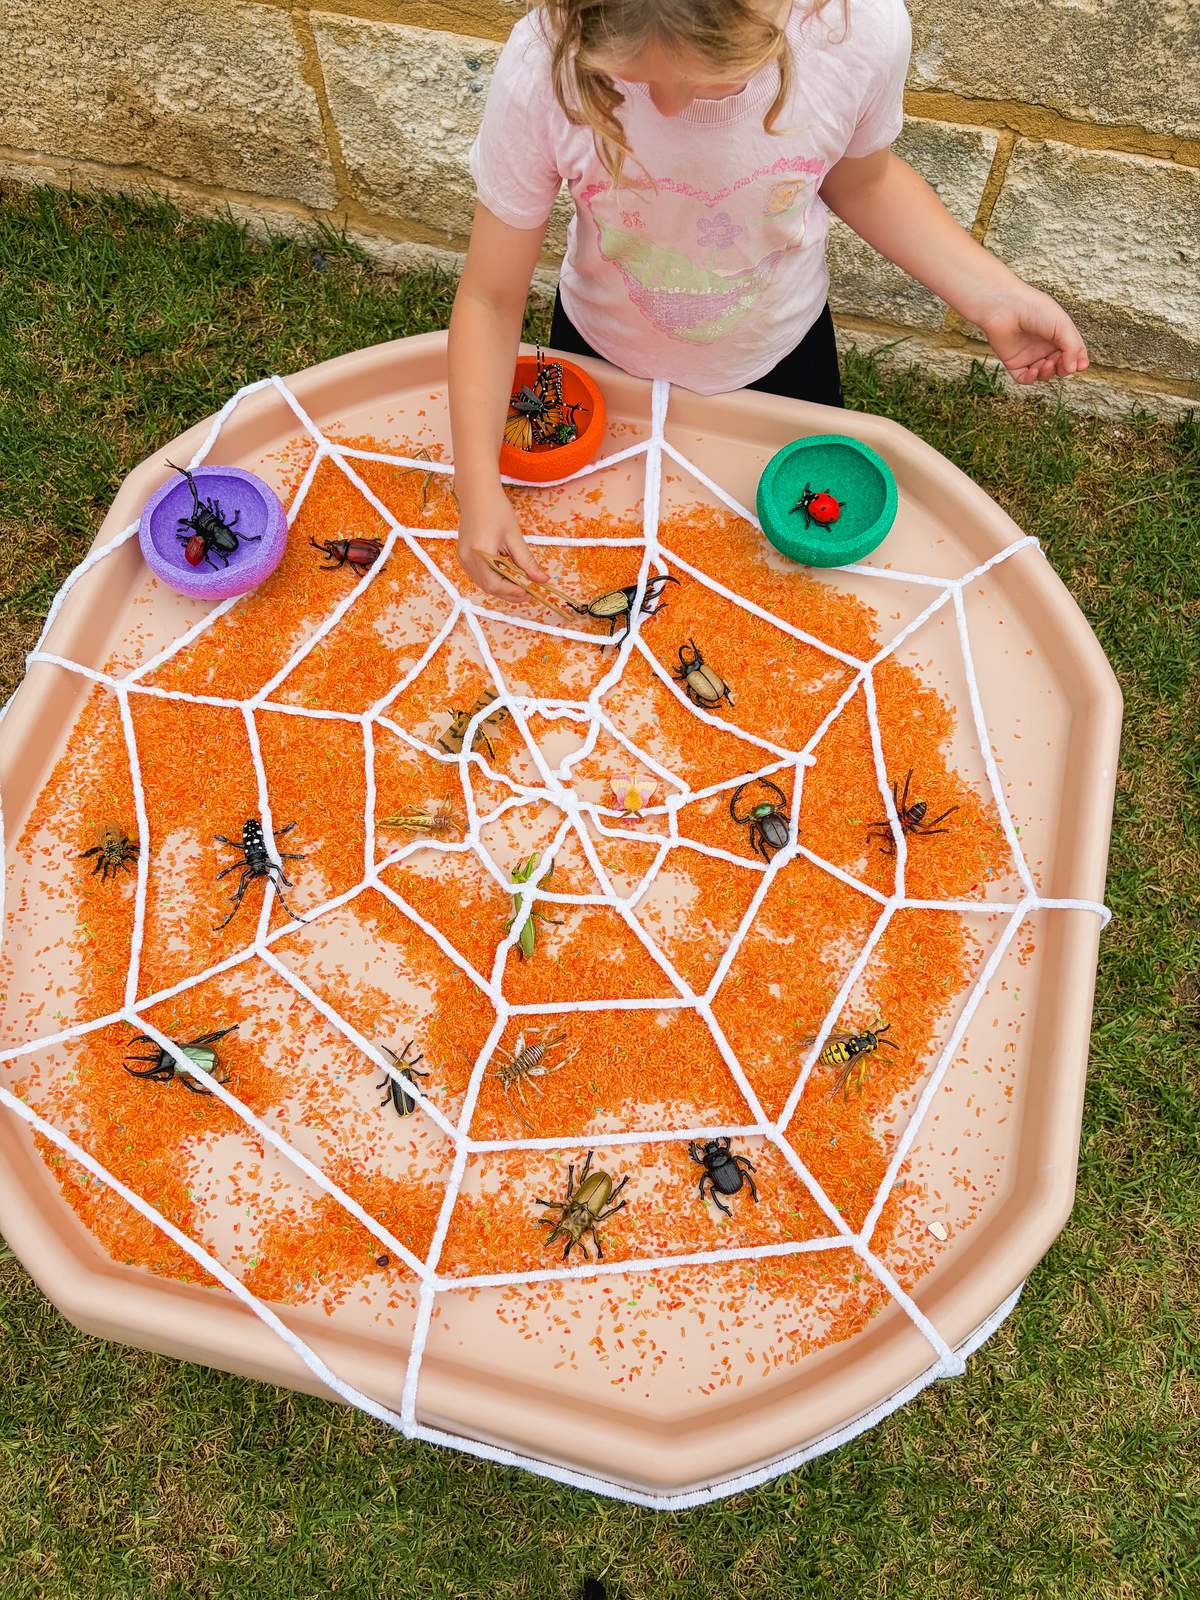
This year Australian Pollinator Week runs from Saturday 7 to Sunday 15 November 2026. It's a nationwide spotlight on the bees, butterflies, beetles, birds, bats and other creatures that help plants make seeds and fruit. Here's our favourite minibeast set-up for the week: a giant spider web full of bugs to rescue, count and sort, plus a few easy ways to stretch it into a real-life bug hunt and a little pollinator garden. It works just as well on the back lawn as it does in a kindy yard.
What you'll need
- A tuff tray. We used our Tuff Tray & Stand Package ($245) in beige, which gives everyone room around the edge. If space is tight or you only have one to three children, the Small Tuff Tray & Stand Package ($190) is a smaller alternative.
- An orange or earthy base, enough to cover the tray about 1 to 2 cm deep. Split red lentils straight from the packet look fabulous and need no prep. Coloured rice is another favourite (recipe below).
- A ball of white wool or cotton yarn, and some masking tape.
- A tub of plastic minibeasts: spiders, beetles, ladybirds, butterflies, bees, grasshoppers and ants. Choose chunky ones for younger children.
- Three or four small coloured bowls for sorting.
- Tools: wooden spoons, scoops, kitchen tongs or tweezers, and a magnifying glass if you have one.
Quick coloured rice (if you'd rather not use lentils)
Pop about 1 cup of uncooked white rice per colour into a zip-lock bag with 1 tablespoon of white vinegar and 10 to 20 drops of food colouring. Seal it, shake until every grain is coated, then spread it on a tray lined with baking paper to dry, ideally overnight. Make it a day ahead so it's completely dry before play. Stored in an airtight jar, it keeps for ages and can be reused again and again.
How to set up the spider web

- Pour in your base. Spread the lentils or rice evenly across the tray. A thinner layer is easier to sweep up later and still feels lovely to run fingers through.
- Make the spokes. Cut three or four long pieces of yarn and stretch each one across the tray from rim to rim, crossing in the middle like the spokes of a wheel. Wrap the ends around the raised rim and tape them underneath so they stay put.
- Spin the spiral. Tie a new length of yarn to the centre, then work your way outwards in a spiral, looping it once around each spoke as you go. It doesn't need to be neat. A slightly wonky web looks more like the real thing anyway.
- Catch some bugs. Scatter the minibeasts over the web and into the base. Tuck a few under the yarn so they look properly stuck.
- Add the rescue kit. Place the coloured bowls around the edge with the spoons, tongs and magnifying glass, and you're ready.
Short on time? Skip the spiral and just do the spokes. Children will happily spend ages freeing bugs from a simple star of yarn.
Ways to play
- The great bug rescue. The bugs are stuck! Can you free them before the spider comes back? Using tongs or tweezers instead of fingers turns this into a brilliant fine motor workout.
- Sort them out. Sort the bugs into bowls by colour, by size, or into "can fly" and "can't fly". Older children can sort spiders from insects.
- Count the legs. Insects have six legs and spiders have eight, which is one way scientists tell them apart. Count the legs together and see if every bug ends up in the right group.
- Bury and dig. Hide bugs under the base and invite children to dig them up with a spoon and look at each one under the magnifying glass.
- Tell the story. Who lives on this web? What happens when it rains? Small world play like this is wonderful for building language, so follow their lead.

Take it outside: a real bug hunt
Once the plastic bugs are rescued, go looking for the real ones. Spring is a great time for it. CSIRO says Australia has around 2,000 native bee species that we know of, and most of them are solitary, with each female building her own nest rather than living in a hive. On a sunny, still morning, sit quietly near some flowers and see who visits.
- Bring the magnifying glass and a clipboard for tally marks: bees, butterflies, beetles, ants.
- Look, don't touch. Teach children to watch from a little distance and leave every creature where they found it.
- Back at the tray, children can recreate what they saw with the plastic bugs.
Educator tip: a bug tally across a week makes a lovely Pollinator Week display, and children can compare which creatures turn up on warm days versus cooler ones.
Plant something for the pollinators

Finish the week by swapping the lentils for potting mix and turning your tray into a planting station. Set out small pots, scoops, a watering can and a few seedlings, and let children fill, plant and water. Ask your local nursery which flowering plants suit your garden and attract bees and butterflies where you live. Many WA nurseries are happy to point you towards local natives.
Potting mix needs a little extra care: always wear gloves and a dust mask when handling it, open the bag away from faces, keep the mix damp, and make sure everyone washes their hands well afterwards. Adults should handle the bag and do any pouring.
What they're learning
This one looks like simple fun, and it is. It also connects to the Early Years Learning Framework (V2.0):
- Outcome 2, connected with and contribute to their world: noticing and caring for the creatures in their own backyard or centre garden, and learning why pollinators matter.
- Outcome 4, confident and involved learners: sorting, classifying, counting legs and testing ideas about which bugs belong where.
- Outcome 5, effective communicators: new words like insect, pollen, antennae, web and nectar, plus plenty of storytelling.
- Fine motor skills: pinching with tongs, untangling yarn and scooping with spoons all build the hand strength children later use for holding a pencil.
Clean-up tip
Lift the bugs out first, then snip or untie the web and roll it up. Tip the tray gently towards one corner and sweep the base into a funnel or jug so it can go straight back into its jar for next time. If you'd like to leave the set-up out for another day, a Tuff Tray Cover keeps out dew, pets and curious birds overnight.
Safety and allergy notes
- Choking hazard. Lentils, rice and small plastic bugs are choking hazards, so this set-up isn't suitable for babies or for children who still put things in their mouths. Supervise closely at all times.
- Not for eating. Raw lentils and dyed rice aren't meant to be eaten. Throw out any base that gets wet or dirty.
- Allergies. Lentils are a legume. If a child has a legume allergy, use coloured rice instead and check ingredients on your food colouring.
- Yarn. Long lengths of string can wrap around little necks and fingers. Keep the web taped to the tray, stay nearby during play, and pack the yarn away afterwards.
- Stand safety. Our stands are for holding the tray only. They're not a table, seat or step.
Ready to play?
If you're setting up a minibeast corner at home, the Tuff Tray & Stand Package ($245) is the tray you see in these photos, and the Small Tuff Tray & Stand Package ($190) is a smaller alternative if space is tight. Add a Grass Tuff Tray Insert ($32.95) and the same bugs have a ready-made meadow to crawl through on another day. For centres and schools running stations for a whole group, have a look at our Education Bundle, or email me at emilie@busylittlefingers.com.au for a quote.
Happy bug hunting!
Emilie